Need to export contacts from your mail client or previous email marketing service provider (ESP)? Find instructions here.
You can import up to 65,000 audience members from an Excel spreadsheet or any number of members from a Comma Separated Values (csv) spreadsheet.
How to import members to your audience:
- From anywhere in audience, click Import. It’s up top. From the import screen, click Create a new import on the top right.
- After reading the permissions reminder, click yes to continue. On the next screen, click Upload a file* and browse your computer to pull up your file. The import screen will offer instructions for prepping your file, including special instructions for importing into special fields. It will also walk you through the steps of mapping the information in each column to the appropriate fields in your account.
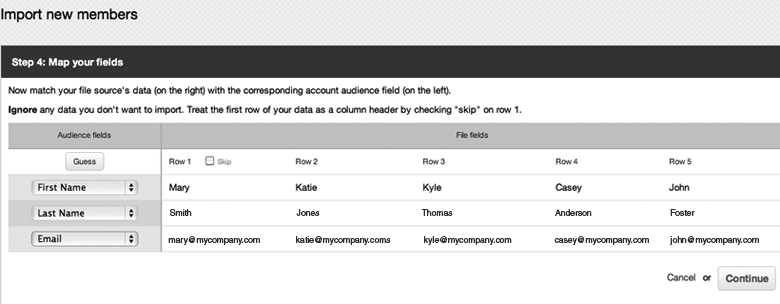
- Map your fields by following the directions on the import screen, or click Guess to let the import screen try to make the matches for you. If your file contains a header row, use the ‘Skip’ option to exclude it from your import. Click Continue
- Next, choose your import style. Add only, and we’ll simply add the new email addresses in your file. Add & update, and we’ll update every member record to match what’s in your file. (Use add & update in cases where you want more information – like company names – to be added to existing member records.
- Create a new group for your import, or select an existing group in your audience. Click Continue. Once you’ve reviewed your import summary, click Import to start the process.
*Note: Currently, we support Excel 97 files (marked with an .xls extension), Excel 2007 (marked with an .xlsx extension) and csv files. If you run into trouble importing your file, consider copying all data and pasting special (values only) to a new workbook before attempting your import again. This helps to clear up troublesome formatting. In general, if you’re having trouble importing an xlsx or csv file, re-saving as xls may do the trick.
Import speed will depend on the size of your file, as well as how large your existing audience is, since imports check every new record against every existing record. It all happens pretty darn fast, but you can refresh your browser window to wait for the icon on the left to change from a clock (in progress) to a green checkmark (success). If the import shows up as a red X, there was a problem. Click on the down-arrow button to the right to ‘View error’ and follow the instructions to re-import the newly tweaked file.
After a successful import, you can also click that down-arrow button to the right to ‘View Import Statistics.’
Helpful Tips
- Don’t worry if your file contains several entries of the same email address. We’ll weed those out during import and also look for any improperly formatted email addresses (which we’ll move to the error bin for easy cleanup).
- Over time, you may build up a list of completed imports. You can leave these in your account, or you can delete them by clicking the options button to the far right of the file’s name. Choose ‘Delete this Import.’ Deleting the import will not affect the audience group to which these members were added.
Importing to custom fields
It’s easy enough to import text into text fields. But what happens when you’re importing into a custom field that’s a pull-down menu of dates or state abbreviations, or a series of check boxes or radio-button choices? If you’re importing into one of these special fields, you’ll want to take a minute before you import to make sure the information in your import file follows these standard formatting rules:
- For Dates, make sure every one follows the format mm/dd/yyyy.
- For Checkbox menus, make sure each option is separated by ‘:::’ (three colons, no spaces). For a menu of favorite pizza toppings, the options in your spreadsheet might look like this: cheese:::sausage:::onions.
- For Dropdown and radio button menus, make sure your Excel file’s options match your drop-down menu options exactly. ‘New York’ won’t match up with ‘NY’ and needs to be converted prior to import. Also make sure your options don’t contain more than 200 characters of text apiece.
- For Select multiple fields, make sure each option is separated by ‘:::’ (three colons, no spaces).
There are quick, easy ways in Excel to change the formatting of an entire column of data. Be sure to use Microsoft Excel’s help section if you’re not sure how.
Importing the same list twice
You can import a list you’ve imported before without any trouble.
If you’ve already imported a list of, say, 500 people, and now that list is up to 1,000, you can import the full list of 1,000 on top of your existing group. One of the final screens of import will ask you to choose your import style: choose Add only, and we’ll simply add the 500 new people (based on email address). Choose Add & update, and we’ll add the new 500 and make sure the previous 500 people have all been updated to match what’s in your file. Add & update is helpful if you want to update people’s contact information or add more information than an earlier import contained.

Helpful tip
In order to import your contacts into your audience section, you’ll need to prepare an Excel workbook or Comma Separated Values (.csv) file with each piece of data (email, first name, last name, etc) in discreet columns. (Remember, email address is the only required piece of data.) Oftentimes, this means exporting current contacts from your personal mail program. Once your file is ready, you can import your contacts directly into your audience. To help you on your way, we’ve gathered instructions from the various mail clients out there. Click on the mail client’s name to visit its official help page: